Key Stores
A Local CA makes use of a Key Store. This is where the CA keys will be generated and stored
A key store must be available before a Local CA can be created - as it relies on this for the key generation
Key Stores can be one of the following types:
-
- The CA keys will be secured using software based encryption and stored in the database
- PKCS#11
- An HSM (Hardware Security Module) that supports the PKCS#11 interface may be used to generate and store the CA keys. Any HSM that supports the PKCS#11 interface may be used, but the following are specifically supported:
- Thales Luna and DPoD (Data Protection on Demand)
- nCipher
- Utimaco
- AWS Cloud HSM
- An HSM (Hardware Security Module) that supports the PKCS#11 interface may be used to generate and store the CA keys. Any HSM that supports the PKCS#11 interface may be used, but the following are specifically supported:
- Google KMS
- A key ring in Google Cloud may be used for key storage. Again, Certdog enforces HSM protection for these keys
- Azure Key Vault
- A Key Vault in Azure can be used. Note: Certdog enforces HSM protection for keys and this is only supported on the Key Vaults created in the Premium pricing tier (Certdog will not operate with Standard tier Key Vaults)
Obtaining Credentials and Settings
Before you create a Key Store, the required credentials must be obtained. These are dependant on what type of key store is being used
Software
Only a password is required for software key stores. This password is used to protect any keys generated by the CA. The password itself will also be encrypted before being stored
PKCS#11
The PKCS#11 interface makes use of a local library which interfaces to the HSM
This library is provided by the HSM vendor and the setup of this (and any other required configuration) is vendor specific
Note that this setup must be performed on the Certdog server itself - not on the client accessing the Certdog server
Once setup, the following pieces of information are required:
-
The PKCS#11 Library
This is the library providing the PKCS#11 interface. The full path is required. A typical example for an nCipher HSM’s library is:
Windows:
C:\Program Files (x86)\nCipher\nfast\toolkits\pkcs11\cknfast-64.dllLinux/Unix:
/opt/nfast/toolkits/pkcs11/64/libcknfast.so -
Slot
A PKCS#11 device can host many slots which may refer to partitions (on Luna HSMs) or cardsets (on nCipher HSMs). Each slot may use a different password. This will all be configured during the HSM setup so you just need to be sure your password matches with the slot you will reference
-
Password
This is the password used to authenticate to the HSM. It may be an operator cardset passphrase (in the case of nCipher) or a partition passphrase (in the case of Thales Luna) or a combination of username and password as required by the AWS Cloud HSM (which requires the password in this format:
username:password) -
Use Module Protection
Some HSMs allow access without requiring a password. Access to the HSM should then be secured using other mechanisms (e.g. network layer security)
Google KMS
To use a key ring in Google Cloud, the following are required. These can be obtained/configured from your Google Cloud account:
-
Project
This is the project ID as displayed in the Home dashboard:
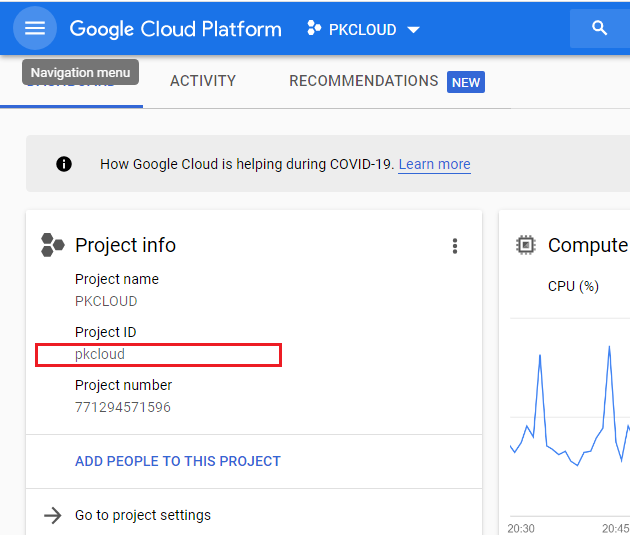
NOTE: When entering the project name into the EzSign properties, even if the project name is case sensitive, the name must always be entered in lower-case in the properties file. This is a Google API requirement. E.g. if the project name in Google appears as PkCloud, the value entered in the properties file must be pkcloud
-
Key Ring Location
You must have created a key ring from the Security → Key management section in Google Cloud
When the key ring has been created the location will be displayed (e.g. us-west4, europe-west2 etc.)
Note that it is recommended that a dedicated key ring be assigned to Certdog as it will be creating and deleting keys within this key ring
-
Key Ring Name
The name you assigned to the key ring e.g. certdog
-
Key Ring Credentials
This is the JSON credential string associated with a service account that has permissions to access the key ring
A service account can be created from the IAM & Admin → Service Accounts section in the Google Cloud Console. It is recommended that a dedicated service account is created for Certdog
The account must have the following roles:
- Cloud KMS Admin
- Cloud KMS CryptoKey Signer
- Cloud KMS CryptoKey Public Key Viewer
To obtain the JSON credential, select the Keys section for the service account and select Add Key, choosing JSON as the Key type. Download the produced JSON file - it is the contents of this file that must be pasted into the Key Ring Credentials section
Azure Key Vault
Note that only the premium tier of Key Vaults can be used with Certdog as HSM backed storage is enforced. When creating a Key Vault, ensure that the Pricing tier selected is: Premium (includes support for HSM backed keys)
Also, ensure that the Access configuration is set to the Vault access policy permission mode. This is required to limit access to the vault from the App registration only, with access limited to only a few key and certificate operations.
To use a Key Vault in Azure, the following are required. These can be obtained/configured from the Azure Portal:
-
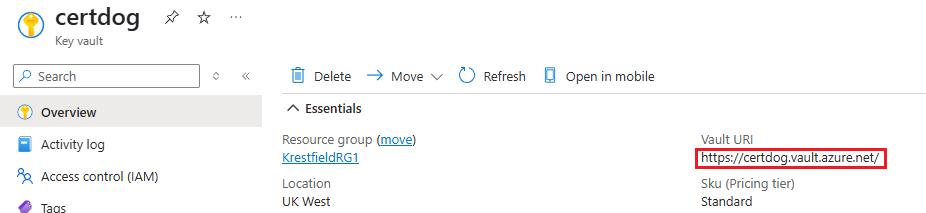
Key Vault Name
This is the Vault URL as displayed on the Key Vault’s overview page, it is not the display name. I.e. in the example below the Key Vault Name required is: https://certdog.vault.azure.net
-
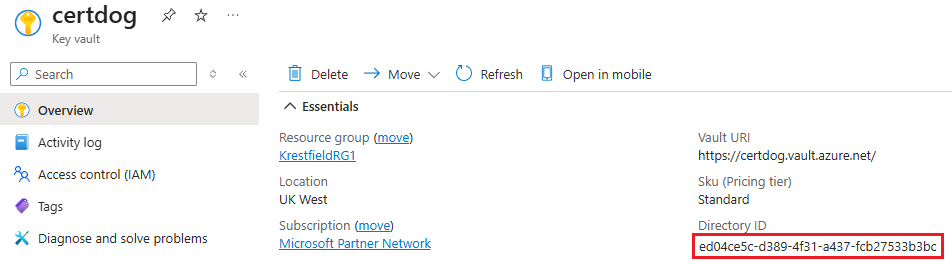
Key Vault Tenant ID
This is also referred to as the Directory ID. This value can be obtained from the Key Vault’s overview page. See the highlighted item in the example below:
-
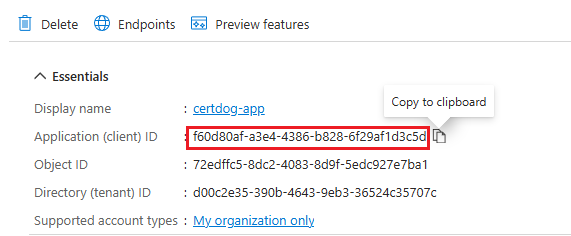
Key Vault Client ID
This is the ID of an App registration. Referred to as the appId or Application (client) ID (depending where it is displayed in Azure). See the steps below on how to create an App registration and obtain this value
-
Password
This is a secret associated with the App registration. Also referred to as the client secret (or Value of the client secret). See the steps below on how to create a Secret and obtain this value
To obtain these values, we need to register an application that will then be authorised to use the key vault:
Obtain **Key Vault Client ID** (Create App Registration)
- If not done so already, create a Key Vault in the Azure Portal
- Once this has been created, from the Portal, navigate to Microsoft Entra ID and under Manage, select App Registrations, from the left hand menu
- From the top menu click New registration
- Provide a name for the application (e.g. certdog-app)
- Select the supported account types
- For the Redirect URI (optional) setting, choose Web and provide a URL. The URL does not need to be a real URL but must be formatted as a URL. For example, it could be: https://certdog.myorg.com
- Click Register
- Copy the Application (client) ID. This is the value required for Key Vault Client ID
Next we need to create a client secret. Certdog will use this to authenticate to Key Vault:
Obtain **Password** (Create Client Secret)
- Still in App Registrations, on the All Applications tab. Click on the newly created application. Click Refresh if this is not seem immediately
- From the left hand menu, under Manage, click Certificates & secrets.
- Click New client secret
- Give the secret a description and expiry date and click Add
- Copy the Value. Ensure you do this now and do not leave the page. This is the only time it will be visible

Note: This value is sensitive as it will grant access to the Key Vault. Ensure it is sufficiently protected.
Lastly we need to grant access from this application to the Key Vault
Grant Access to Key Vault
- Under Key Vaults, click on the Key Vault
- Click on Access policies and click Create
- Select the following permissions:
- Key Management: Get, List, Create
- Cryptographic Operations: Sign
- Certificate permissions: Get
- Click Next
- Locate and select the application (created above e.g. certdog-app) and click Next then Next again
- Click Create
These details will be entered into the Key Store configuration as follows:
However, see the Creating a Key Store section below.
Trouble Shooting
When using a Key Vault, if you see this error
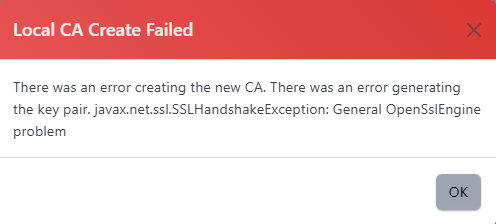
This is likely to be due to Microsoft Key Vault using a TLS CA certificate that is not trusted by Certdog.
To rectify, perform the following steps:
-
Obtain the Azure Root Certificate
Navigate to the Key Vault URL from a browser and download the Root CA certificate (e.g. AzureRoot.crt)
-
Open a command prompt as Administrator and run the following command (altering to your own certdog installation location):
> keytool -import -trustcacerts -alias azureroot -file "AzureRoot.crt" -keystore "c:\certdog\config\sslcerts\dbssltrust.jks"
Enter the key store password of temp1234! and choose “yes” to accept the certificate.
Configuring via Command Line
This can also be configured from the command line.
-
Next, open Azure Cloud Shell (this example is using a bash shell) either by clicking the shell icon from the Portal:

or by navigating to https://shell.azure.com/
-
At the prompt type the following to create a service principal called certdog (though you can name this whatever you want):
az ad sp create-for-rbac -n certdog --skip-assignmentE.g.
az ad sp create-for-rbac -n certdog --skip-assignment The output includes credentials that you must protect. Be sure that you do not include these credentials in your code or check the credentials intoyour source control. For more information, see https://aka.ms/azadsp-cli 'name' property in the output is deprecated and will be removed in the future. Use 'appId' instead. { "appId": "fd94f971-ebd9-4a32-a56e-97427655429e", "displayName": "certdog", "name" : "fd94f971-ebd9-4a32-a56e-97427655429e", "password": "nScc7-6T.gOI7.ugHawFRRoUbwUA_agrC-", "tenant": "36524c35-390b-4343-390b-36524c35707c" } - Note the following items:
-
appId
This is your Key Vault Client ID
-
password
This is the required password
-
tenant
This should be the same value as displayed for Directory ID on the key vaults overview page and is the Key Vault Tenant ID
-
-
We must now set the permissions on the key vault for this application. To do this, type the following at the shell:
 export AZURE_CLIENT_ID=[value for appId returned above]
 export AZURE_CLIENT_SECRET=[value returned for password above]
 export AZURE_TENANT_ID=[value returned for tenant above]

 az keyvault set-policy --name [Key Vault Name] --spn $AZURE_CLIENT_ID --key-permissions delete get list create sign verify encrypt decrypt wrapKey unwrapKey –-certificate-permissions get list
The [Key Vault Name] in this instance is not the full URI, but just the name. For example, if you had created a key vault called certdog. Its URI would be: https://certdog.vault.azure.net/ but the name required here would just be: certdog
For example:
export AZURE_CLIENT_ID="fd94f971-ebd9-4a32-a56e-97427655429e"
export AZURE_CLIENT_SECRET="nScc7-6T.gOI7.ugHawFRRoUbwUA_agrC-"
export AZURE_TENANT_ID="36524c35-390b-4343-390b-36524c35707c"

az keyvault set-policy --name certdog --spn $AZURE_CLIENT_ID --key-permissions get list create sign --certificate-permissions get
You would now have created an account that can be configured in Certdog to access your key vault.
Creating a Key Store
- From the certdog application, login as an Administrator
- From the menu select, Local CA → Key Stores
- Click Add New Key Store
- Enter a Name for the Key Store. This can be anything you like and is used to reference it later
- Select the Key Store Type from the drop down
Software
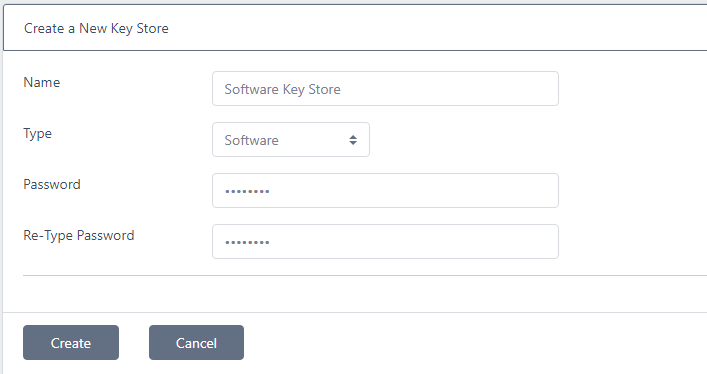
Enter a password, retype and click Create
Note that this password will be used to protect any keys created by Local CAs that use this key store. Ensure it meets your password security requirements
PKCS#11
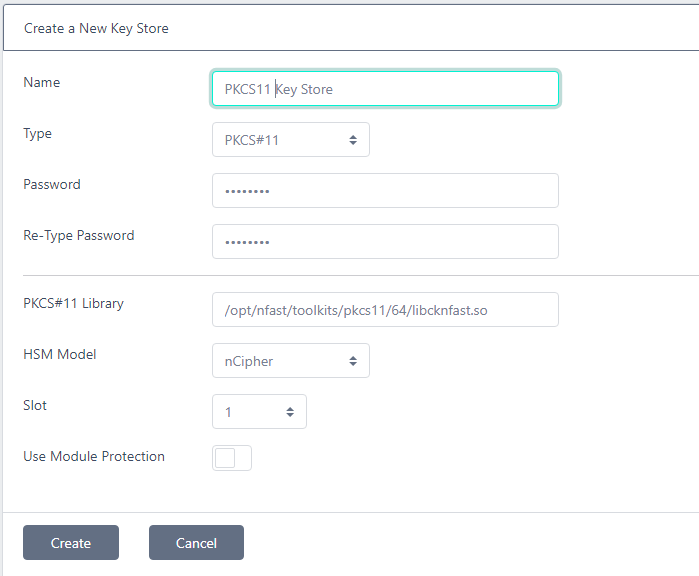
Enter the Password, PKCS#11 Library, HSM Model and choose the Slot as per the details outlined above and click Create
Google KMS
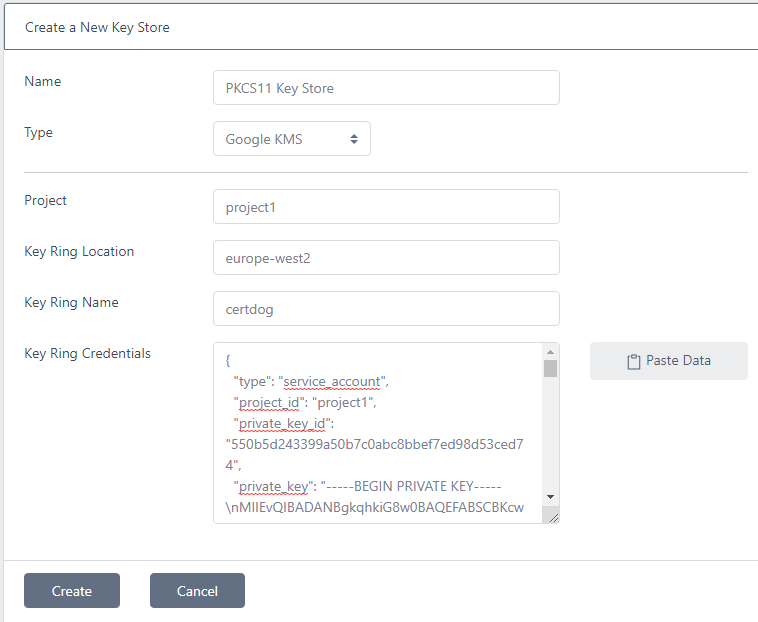
Enter the Project, Key Ring Location, Key Ring Name as obtained above. For the Key Ring Credentials, open the JSON file that was downloaded and copy its contents into the box. Click Create
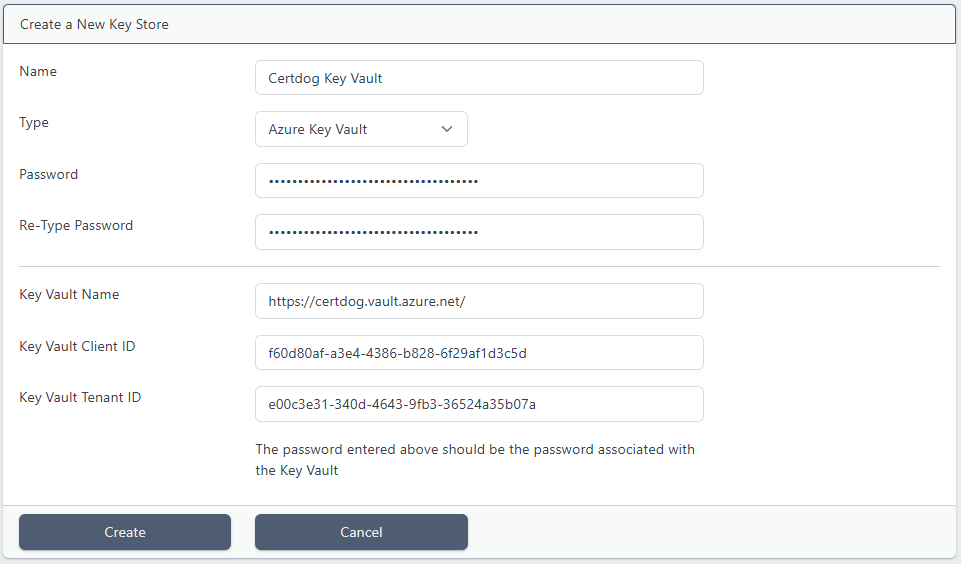
Azure Key Vault
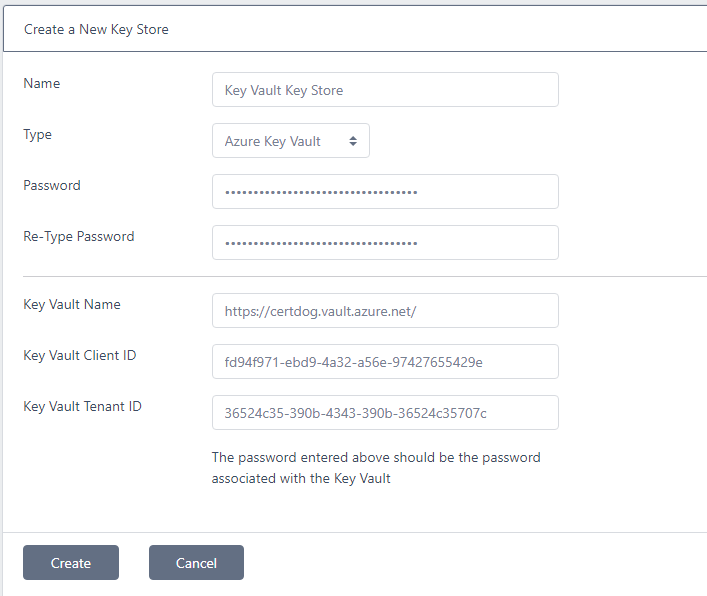
Enter the Password, Key Vault Name, Key Vault Client ID and Key Vault Tenant ID as obtained from above. Click Create