Certdog Post Installation Configuration
Once certdog has been installed, there are a few key pieces of configuration that should be carried out.
Set the system URL
Certdog needs to be told how it will be accessed externally so it can populate the correct URLs for items such as CRL Distribution Points, OCSP end points and email links
If this is not done, certdog will default to 127.0.0.1 within these URLs
To set the System URL, from the menu click on Settings under MANAGEMENT
For version 1.16 onwards, select Settings
For versions before 1.16, select Email Settings
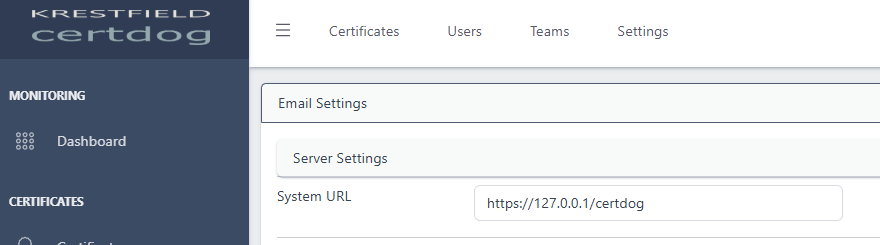
Update the value for System URL to be the URL containing the DNS FQDN at which certdog will be accessed externally. For example, often the server will have a DNS entry such as certdog.org.com and users would then access certdog via: https://certdog.org.com/certdog. In this case System URL would be updated to that value, I.e. https://certdog.org.com/certdog
Click Update to save the setting
Set the logon timer
Initially a user will be logged out after 900 seconds and will then have to re-authenticate. To alter this, navigate to Settings then Settings. Update these values:
- API Key Total Lifetime
- This is the total time a user can remain logged in for, assuming they do not exceed the API Key Inactive Timeout value below. E.g. if this were set to 3600 seconds, after 1 hour they would be logged out regardless of how often they interacted with the system
- API Key Inactive Timeout
- This is the period of inactivity, after which a user will be logged out. E.g. if this were set to 300 the user will be logged out if they are inactive for 5 minutes
Click Update once the chosen values have been set
Set the private key retention period
When a user creates a certificate using the DN Request option, certdog generates the CSR (Certificate Signing Request) and keys on behalf of the user
By default certdog does not store these keys - in which case the user must download the issued certificate immediately as a PKCS#12
However, certdog can securely store the keys for any period, allowing the user to download the certificate and keys in PKCS#12/PFX, JKS or PEM formats for a time after generation. After the prescribed time period, the keys will be deleted
For example, you could give users an hour during which they may return to the system and download their issued keys/certificates
To set this key retention period, from Settings update the Private Key Retention Period to the required value:

Click Update to save.
Create some CAs
To start issuing certificates, certdog either needs to host its own CAs. Or interface to an external CA
To create internal CAs, follow this guide:
To interface to an external Microsoft CA, follow this guide:
And to interface to an external EJBCA CA, follow this one:
Set the SSL certificate
The server should have a trusted SSL certificate installed, associated with the server DNS name, so that the site is trusted by users
Follow the steps below to configure this:
Configure Server’s SSL Certificate
Set up email reminders
To configure email reminders, you need to configure the Email Server settings, then the email details and frequency. See below on how to do this:
Update the Database SSL certificate
The database listens on an SSL connection (the demo version does not impose this). This is configured with a default certificate issued from a Krestfield test CA. This certificate should be one issued from your internal trusted CAs
To update this certificate follow the steps below: