Migrate CA Software Keys to Certdog
Applies to Certdog Version 1.5+
Any CA that uses software keys that can be exported as a PFX/PKCS#12 file can be imported into Certdog
This is the case for Microsoft (ADCS) CAs that store their keys in software but is also applicable for other CAs (such as the RSA Certificate Manager)
Step 1 - Export the CA Keys
Depending on the CA being used, the steps to export the CA keys as a PFX/PKCS#12 file may differ. For a Microsoft CA, the following can be performed:
- Logon to the server hosting the CA
- Click start, type
mmc.exeand press Enter - From the console, click File > Add/Remove Snap-in…
- From the Available snap-ins section, select Certificates and click Add >
- Select Computer account, click Next, select Local computer and click Finish. Click OK
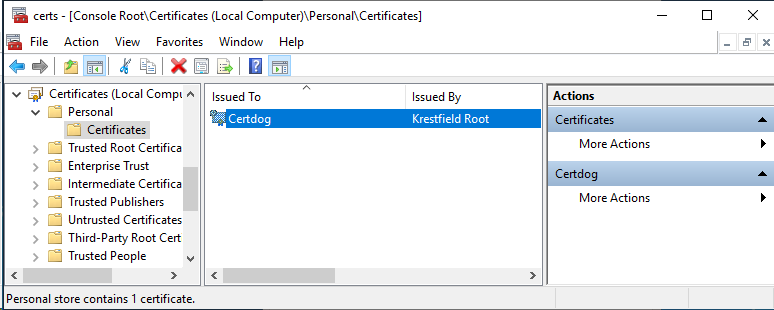
- Navigate to Certificates (Local Computer) > Personal > Certificates and locate your CA certificate:
-
Double click this certificate, select the Details tab and click the Copy to file… button
-
Click Next then select Yes, export the private key and click Next again
-
Leave all options as they are and click Next
-
Select Password and enter a strong password and click Next
-
Choose a location to save the file and click Next
-
Click Finish
Note: If the option Yes, export the private key is greyed out, this is because the keys are marked as not exportable
These can still be exported. See the guide here for details on how this can be performed
Step 2 - Import to Certdog
Copy the PFX/PKCS#12 file to the machine where Certdog is installed
Open a PowerShell window and navigate to the [Certdog installation]\bin directory
From the prompt type the following:
Import-Module .\certdog-module.psm1
login
You will be prompted to enter the certdog username and password and will then be logged in:
Username: [certdog username]
Password: [certdog password]
Attempting login at: https://127.0.0.1/api
Authenticated OK
Next, import the PFX/PKCS#12 file exported from the Microsoft CA by running the Import-LocalCaFromP12 command:
Import-LocalCAFromP12 -name [CA Name] -p12Filename [PFX/P12 File] -p12Password [PFX/P12 Password]
E.g.
Import-LocalCAFromP12 -name "CA Import" -p12Filename msca.pfx -p12Password password
If your password contains special characters that could intefere with standard PowerShell processing, wrap the password with quotes e.g.
Import-LocalCAFromP12 -name "CA Import" -p12Filename msca.pfx -p12Password 'password'
Or you can enter the p12Password as a secure string, as follows:
$password = Read-Host -assecurestring "Enter P12 Password"
$p12Password = [System.Runtime.InteropServices.Marshal]::PtrToStringAuto([System.Runtime.InteropServices.Marshal]::SecureStringToBSTR($password))
Import-LocalCAFromP12 -name "CA Import" -p12Filename msca.pfx -p12Password $p12Password
During the import a Key Store will be created for this CA, with the name [CA Name] Key Store (e.g. CA Import Key Store) and password being the [PFX/P12 Password] specified. However, you can also specify an existing Key Store using the -keyStoreId parameter e.g.
-keyStoreId 6131fe2fb6b0c54c13c59935
You can also specify the following attributes at this point, or they can be set later via the UI
- -cdps
- An array of CRL Distribution Points.
- e.g.
-cdps @("http://serv1/crl1.cr","http://serv2/crl2.crl")
- -aiaOcspUrls
- An array of AIA OCSP locations
- e.g.
-aiaOcspUrls @("http://serv1/ocsp")
- -aiaIssuerUrls
- An array of AIA issuer URL locations
- e.g.
-aiaIssuerUrls @("http://server1/cacert/cer")
- -generateCrls
- Include this switch if this CA should generate CRLs
- -crlLifetimeMinutes
- The lifetime of each CRL generated
- -crlGenerationMinutes
- The period between each CRL generation
- -crlFilename
- The local filename of the CRL