OAuth 2.0 and OIDC Integration
This feature is available from certdog 1.15
Certdog supports authorization and authentication of users via OAuth 2.0 and OIDC services, including processing of group membership.
Currently, the following provider(s) are supported:
- Microsoft Entra ID (formerly Azure AD)
Enabling OAuth support does not disable the use of local or Active Directory accounts. I.e. all three authentication options can be enabled at the same time.
Details on how to enable this with Entra ID are given below. The steps are detailed but still, some familiarity with Entra ID is needed. If in any doubt, contact Krestfield Support who can assist with the setup process.
Before Starting
Access to Azure Entra ID is required, with permissions to create an App Registration. If another team manages that configuration, they can follow the Create an App Registration in Microsoft Entra ID instructions below and provide the required values (e.g. [REDIRECT-URI]) for importing into certdog.
Ensure that the correct URL has been configured for certdog (as described here) and ideally the final TLS certificates have been installed (as described here).
This is required as we will need to configure redirect URLs within Entra ID. These should be the final URLs that all users will access the system from.
When certdog is initially installed you may access at 127.0.0.1. But when completing the steps above you may configure a DNS entry to point to the certdog server. When you would access as something like https://certdog.domain.local. This would then be the URL to configure in the Entra ID settings below.
Configuring OAuth
To enable OAuth and OIDC support you must:
These steps are detailed in the next sections.
Create an App Registration in Microsoft Entra ID
From Azure, click on Microsoft Entra ID and navigate to App registrations
Create a New App Registration
Ensure you have the correct hostname for the certdog server. E.g. https://certdog.intserver.local as discussed in the Before Starting section above.
-
Click + New registration
-
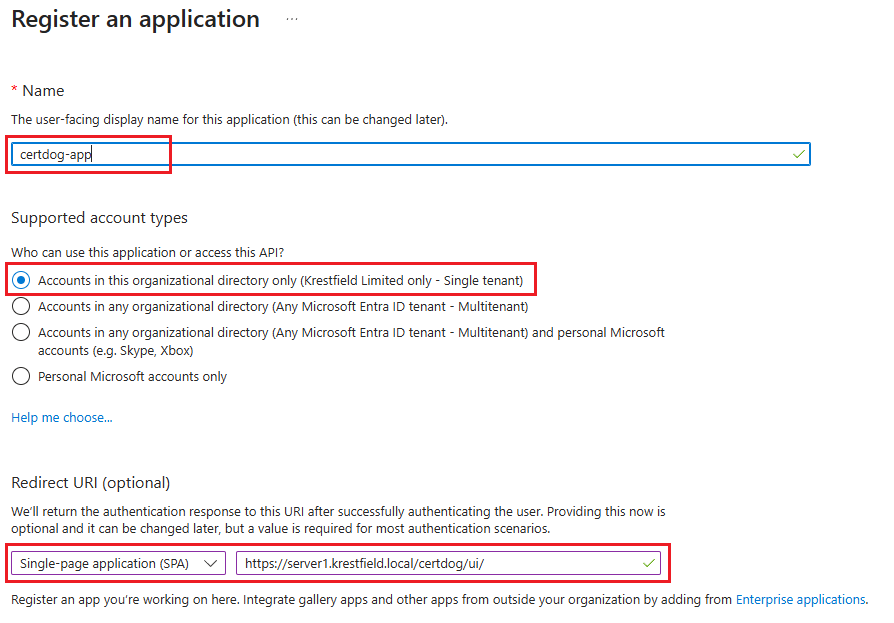
Enter a name for the application, e.g. “certdog-app”
-
For Supported account types select Accounts in this organizational directory only
-
Under Redirect URI (optional), choose Single-page application SPA from the Select a platform drop down and enter the Cert User Interface URL in the form:
https://[certdog hostname]/certdog/ui/
E.g. if your instance is located at https://certdog.intserver.local the full URL to enter would be:
https://certdog.intserver.local/certdog/ui/
NOTE: This MUST be the URL you will be accessing the certdog server from. If it is wrong, redirection after authentication will fail.
- Note this value as it is the [REDIRECT-URI] and will be required later
- Click Register
If you will be accessing certdog from multiple URLs - in addition to the one set in Step 4 above (e.g. if you have several DNS aliases configured or will also be accessing a local at 127.0.0.1). Add the additional locations as follows:
From the newly created app registration click on Authentication (under the Manage section). In the Single-page application section, click the Add URL link and enter any other possible URLs. E.g.
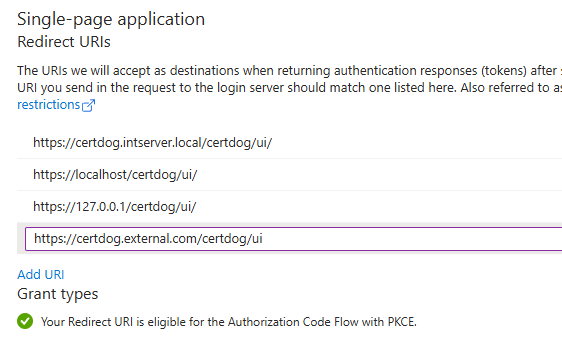
Click Save
Expose the API
-
From the new app registration, navigate to Owners (under the Manage section) and add your own account as an owner if not already listed
-
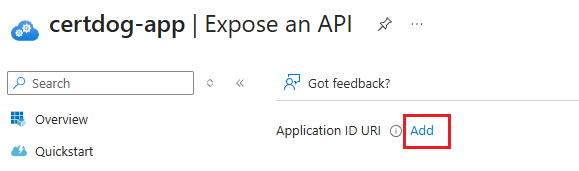
Next, navigate to Expose an API and click the Add link to the right of Application ID URI and click Save accepting the default value for the Application ID URI
-
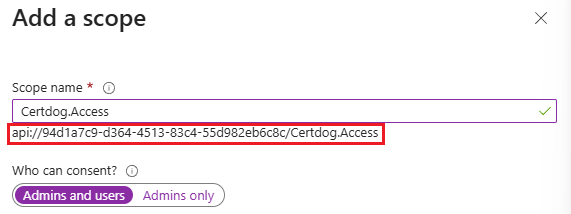
Click + Add a scope and for
-
Scope name enter Certdog.Access
-
For who can consent select Admins and users
-
for Admin consent display name enter something like Access the Certdog API
-
for Admin consent description enter something like Allows the app to access and modify certdog API data
-
-
Note the value beneath the Scope name text box:
E.g.
api://12720666-5016-408f-8691-0565a23faa3b/Certdog.Accesswhich is made up of the Application ID URL and the Scope name -
Note this value as it is the [API-SCOPE] and will be required later
-
Click Add scope
Add Permissions
-
Navigate to API permissions (under the Manage section)
-
Click + Add a permission, select the My APIs tab and select the name of the application (e.g. certdog-app)
-
Under Select permissions select Certdog.Access and click Add Permissions
-
Click + Add a permission again, select Microsoft Graph, then Delegated permissions
-
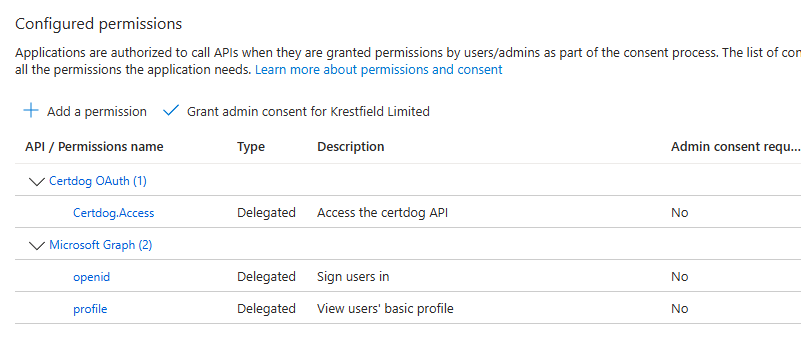
Search for and select openid and profile then click Add permissions
-
Click the three dots at the end of the User.Read permission under Microsoft Graph and select Remove permission, then Yes, remove
The permissions should look like this:
Enable the claims for user identification and group support
- From the app registration, navigate to Token Configuration (under the Manage section)
- Click + Add optional claim, select Access and check upn. Click Add
- Click + Add groups claim, select Security groups, then click Add
Enable OAuth 2.0 Support
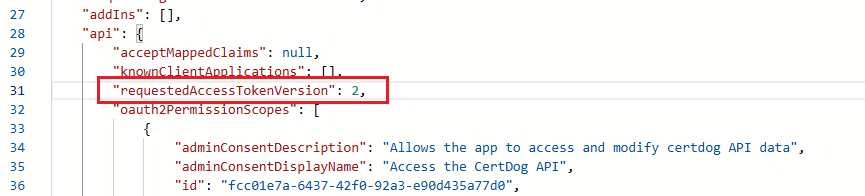
- From the app registration, navigate to Manifest (under the Manage section)
- Search for (CTRL-F) requestedAccessTokenVersion and change the value from null to 2 and click Save
Obtain Required Values
-
From the app registration, navigate to Overview
-
Copy the value for Application (client) ID
E.g.
e02d66e2-ae76-479c-8383-dbd209088538 -
This is the [CLIENT-ID] value we will need below
-
From the top menu click on Endpoints
-
Copy the value for Authority URL (Accounts in this organizational directory only)
E.g.
https://login.microsoftonline.com/0d285301-66f1-496e-9915-2008a8603591 -
Add
/v2.0to the end of this string e.g.https://login.microsoftonline.com/0d285301-66f1-496e-9915-2008a8603591/v2.0 -
This is your [ISSUER-URI] value we will need below
-
The [REDIRECT-URL] should have been noted in the setup steps above
-
The [API-SCOPE] should also have been noted in the setup steps above
The Azure EntraID Configuration is now complete. Ensure you have noted the values for:
- [REDIRECT-URI]
- e.g.
https://server1.krestfield.local/certdog/ui/
- e.g.
- [API-SCOPE]
- e.g.
api://94d1a7c9-d364-4513-83c4-55d982eb6c8c/Certdog.Access
- e.g.
- [CLIENT-ID]
- e.g.
94d1a7c9-d364-4513-83c4-55d982eb6c8c
- e.g.
- [ISSUER-URI]
- e.g.
https://login.microsoftonline.com/0d285301-66f1-496e-9915-2008a8603591/v2.0
- e.g.
Update the API properties file
On the certdog server, open the application.properties file located here:
[certdog install]\config\application.properties
E.g.
c:\certdog\config\application.properties
Add in the following two lines, substituting in the values for [ISSUER-URI] and [CLIENT-ID] as obtained above:
spring.security.oauth2.resourceserver.jwt.issuer-uri=[ISSUER-URI]
spring.security.oauth2.resourceserver.jwt.audiences=[CLIENT-ID]
E.g.
spring.security.oauth2.resourceserver.jwt.issuer-uri=https://login.microsoftonline.com/0d285301-66f1-496e-9915-2008a8603591/v2.0
spring.security.oauth2.resourceserver.jwt.audiences=e02d66e2-ae76-479c-8383-dbd209088538
Save the file
Update the UI config file
On the certdog server, open the config.json file located here:
[certdog install]\tomcat\webapps\certdog#ui\config.json
E.g.
C:\certdog\tomcat\webapps\certdog#ui\config.json
It will contain a configuration similar to:
{
  "apiUrl" : "../api/"
}
Update the contents, as shown below, by adding in the oauth section and populating with the values for [ISSUER-URI], [CLIENT-ID], [REDIRECT-URI] and [API-SCOPE] as gathered above:
{
  "apiUrl" : "../api/",
  "oauth": {
    "server": "[ISSUER-URI]",
    "clientId": "[CLIENT-ID]",
    "redirectUri": "[REDIRECT-URL]",
    "scope": "[API-SCOPE]"
  }
}
Note that there a comma has to be added after the apiUrl entry. It is often easier to copy the entire contents above and substitute in your own values to avoid any formatting mistakes.
E.g.
{
  "apiUrl" : "../api/",
  "oauth": {
    "server": "https://login.microsoftonline.com/0d285301-66f1-496e-9915-2008a8603591/v2.0",
    "clientId": "e02d66e2-ae76-479c-8383-dbd209088538",
    "redirectUri": "https://127.0.0.1/certdog/ui/",
    "scope": "api://12720666-5016-408f-8691-0565a23faa3b/Certdog.Access"
  }
}
Restart Certdog
On windows open the Services snapin, locate and stop the Krestfield Certdog Service. When showing as not running Start the service.
On Linux, run the ./shutdown-certdog.sh script followed by the ./start-certdog.sh from the bin directory
If certdog has already been operating, any browsers used to access the system may have cached previous settings. This cache must be cleared or an alternative browser may be used (e.g. Chrome instead of Edge).
Clearing of the cache is browser dependant but for Chrome, click the menu and choose Settings. From the left menu select Privacy and security. Then click on Delete browsing data. Select Cached images and files and Cookies and other site data, then click Delete data. The keyboard combination of CTRL-SHIFT-DELETE can also be used to bring up the delete browsing data dialog.
Verify Setup
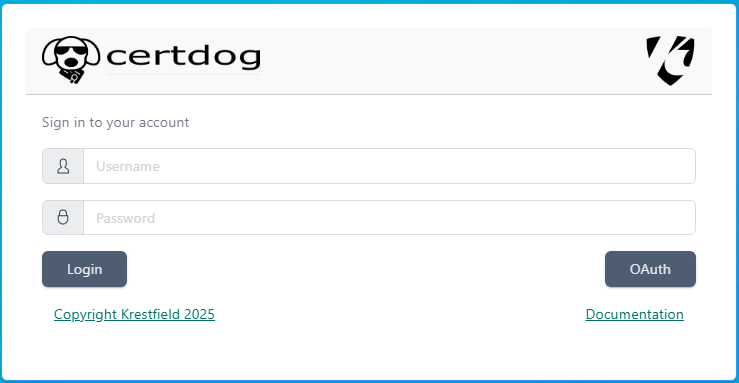
Access the certdog site. If you are still logged in from a previous session, click the user icon (top-right) and click Log Out.
The logon screen should now show the OAuth button:
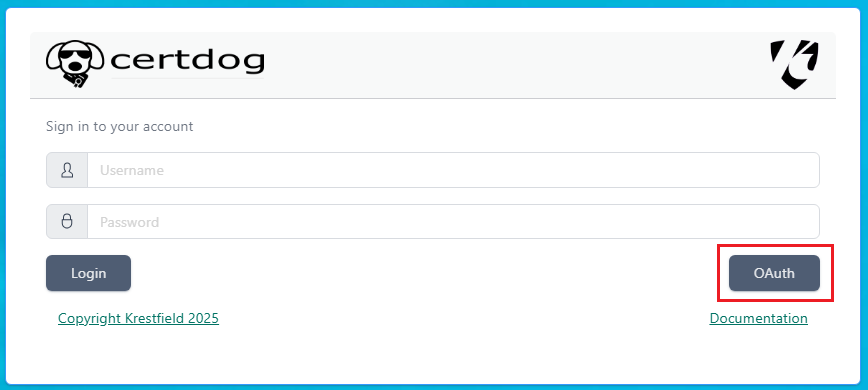
If you don’t see this. Check the config.json file as configured above, ensuring it has an oauth entry and the formatting and data are correct. Ensure that the browser cache has been cleared.
At this point, clicking the OAuth button will fail as no groups have yet been mapped. This needs to be configured first, as described in the next section.
Map Entra ID Groups to Certdog Teams
Before certdog will authenticate users (using their Entra ID credentials) they must be mapped to a certdog Team.
This will define what permissions the user has within certdog.
This is achieved by mapping the users Security Groups to a one or more certdog Teams.
Create Groups in Entra ID
To create a group in Entra ID, from the Microsoft Entra ID service, click on Groups (under the Manage section). Click New Group.
For Group type, select Security
For Group name enter a name e.g. CERTDOG_ADMINS or CERTDOG_NETWORK_TEAM
For Group description, optionally enter some descriptive text
Under Microsoft Entra roles can be assigned to the group, select No
For Membership type, select Assigned
Under Owners, click the No owners selected link and optionally select an owner for the group
Under Members, click the No members selected link and select the users to be members of this group. This can also be performed later - from here or from a specific users’s account. You can also include (nest) other groups within this group:
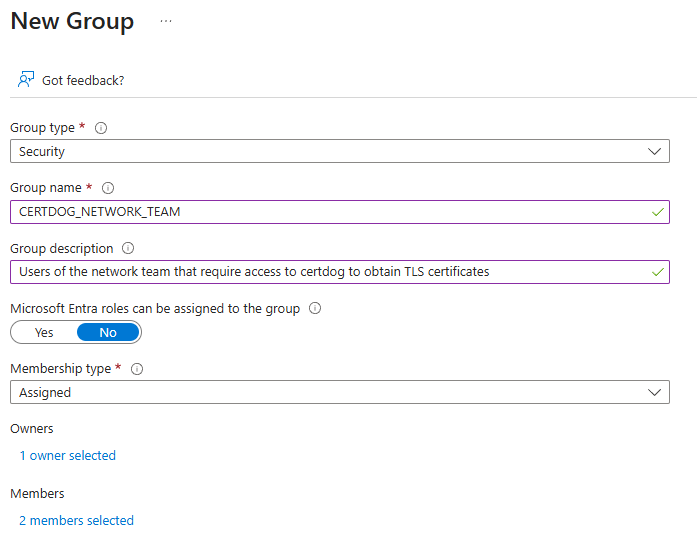
Click Create
From the Groups Overview page, select All groups and click on the group just created:
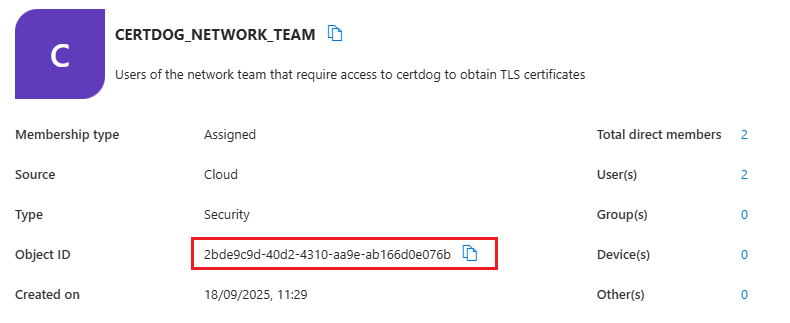
Click the Copy Symbol  to the right of the Object ID value and retain. We now need to set this value in certdog.
Map Groups in Certdog
Log into certdog using a local (or AD, if configured) administrator account. In this case you will have to navigate to:
https://[certdog server]/certdog/ui/#/login
To bypass the OAuth process and login with a local account. Note, if you miss this and log in via the OAuth mechanism, just log out and you will be taken back to the standard login screen.
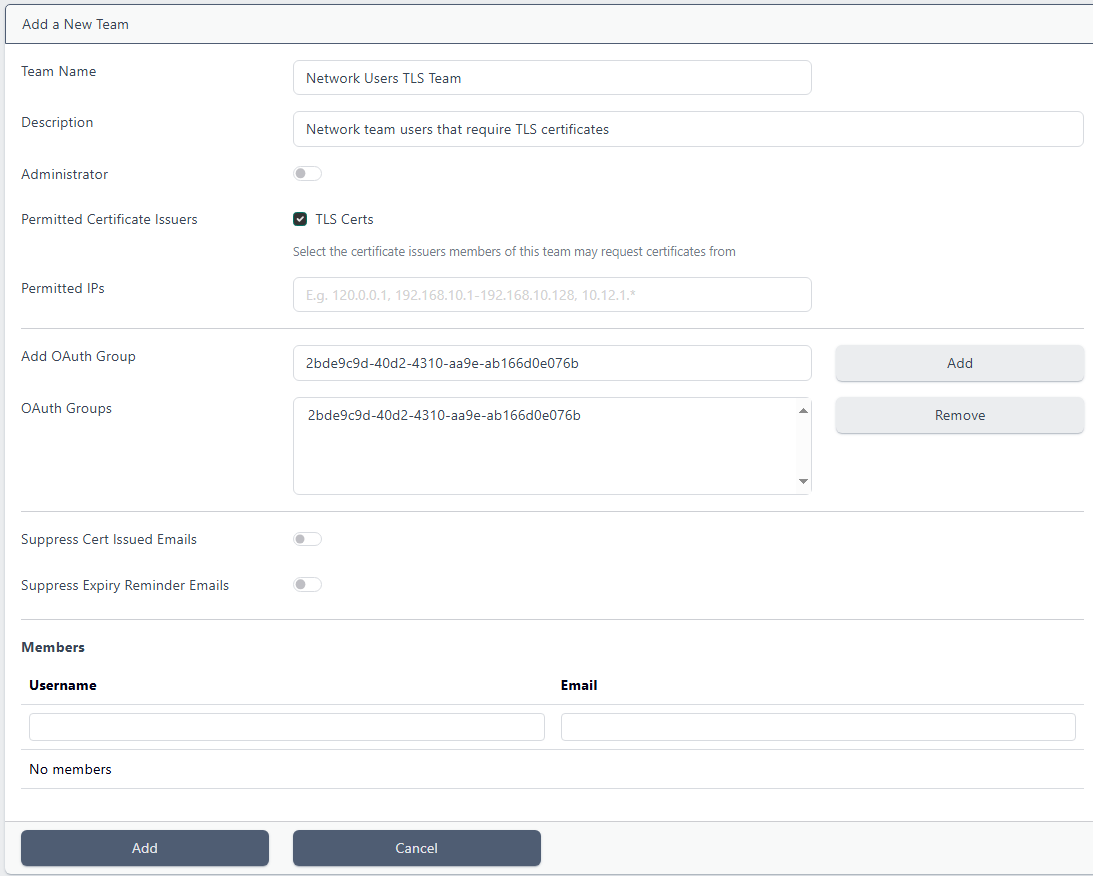
Navigate to Teams and either select an existing or create a new Team.
You should now see options for Add OAuth Group. Paste in the Object ID we copied from the Group above and click Add.
Make any other updates to the team as required and click Add (or Update for an existing team).
Users that are a member of the team created in Entra ID will now have the permissions provided by that certdog team.
Note that when an Entra ID user authenticates, their account will then appear in the Users list in Certdog. This will show what Certdog Teams the user is a member of (based on their Entra ID group membership). None of the details for Entra ID accounts can be managed via Certdog - they continue to be managed via Entra ID only.
Logging in Options
Users with accounts in Entra ID should now be able to login to certdog. The Microsoft login process should take place whenever you navigate to the certdog URL or any links to it (e.g. to certificates) and will use SSO (Single Sign On) to allow access when previously logged in.
There is still the option to login with a local or Active Directory account (if configured). By navigating to the specific login URL:
https://[certdog server]/certdog/ui/#/login
Or by simply choosing the Log Out option from the user icon at the top of the screen. In both cases you will be presented with the login screen:
You may enter username and password details for local or AD users and click Login. You can still invoke the OAuth process from this screen by clicking the OAuth button.
Clicking the OAuth button will always ask you to confirm what account you wish to use. This is intentional to allow the switching of accounts.
Common Issues
Sorry, but we’re having trouble signing you in
If you see the following error during login:
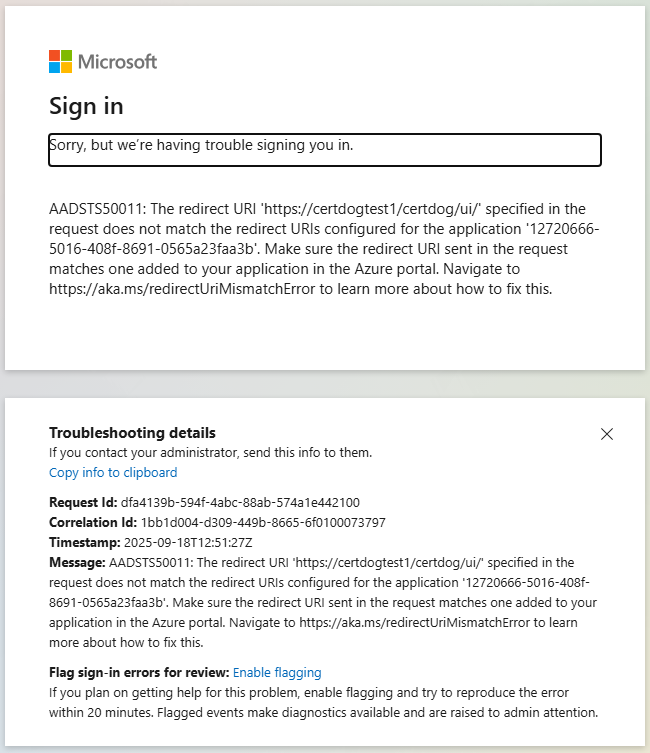
This indicates that the redirectUrl value contained in the config.json file does not match the URL that certdog is being accessed via. OR that the redirect URL configured in the Entra ID App registration is not correct.
To check which this is, perform the following:
Check the config.json file
On the certdog server, open the config.json file:
[certdog install]\tomcat\webapps\certdog#ui\config.json
It should look like something like the following:
{
  "apiUrl" : "../api/",
  "oauth": {
    "server": "https://login.microsoftonline.com/0d285301-66f1-496e-9915-2008a8603591/v2.0",
    "clientId": "12720666-5016-408f-8691-0565a23faa3b",
    "redirectUri": "https://certdg.org.local/certdog/ui/",
    "scope": "api://12720666-5016-408f-8691-0565a23faa3b/Certdog.Access"
  }
}
Check the value for redirectUrl and ensure it matches the URL you are accessing the certdog server with exactly.
In the case above it is set to https://certdg.org.local/certdog/ui/ but it should be https://certdog.org.local/certdog/ui/.
If different, save the file and restart as per the Restart Certdog above.
Check the Entra ID App Registration Redirect URL
Navigate to the App registration in Entra ID. Expand the Manage section and click on Authentication.
Check the values for Redirect URIs under the Single-page application section:
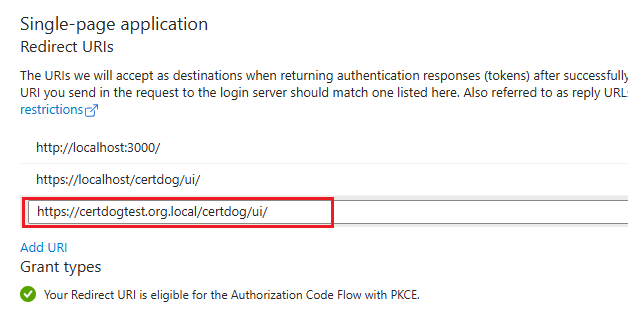
In this case the certdog service is being accessed from https://certdog.org.local but the redirect URL only has an entry for https://certdogtest.org.local. Correct this and save the Authentication.
After updating the OAuth configuration, the changes don’t seem to take effect
When the configuration has been updated, the services must be restarted. If the same browser accessed certdog when the previous settings were enabled, it may cache some of the configuration. Effectively, this prevents the changes from being used.
Ensure the Certdog Service has been restarted and the browser cache has been delete. Refer to the Restart Certdog above for details.
Redirected back to Login screen after authentication
Misconfigured Groups
Authentication seems to complete OK but you are then just redirected back to the login screen.
This usually indicates that the authentication has failed at the certdog side. Check the logs ([certdog install]\logs\certdog.log). An entry such as the following:
[system] User with oid 'd1621529-1895-4245-bf3a-ba81d1cbcbf1' failed to authenticate via OAuth token, missing required claims.
Indicates that the user is not part of a group that has been mapped to a certdog Team. See section Map Entra ID Groups to Certdog Teams for details on how to do this.
Or the App registrations in Entra ID are not including the correct claims. See Enable the claims for user identification and group support for details how to enable this.
Untrusted Certificates
If the groups appear correct. Examine the console.out log file, located in the [certdog install]\bin directory.
Browser for any errors. If you can notice entries and search for PKIX path building failed e.g.
Caused by: javax.net.ssl.SSLHandshakeException: PKIX path building failed: sun.security.provider.certpath.SunCertPathBuilderException: unable to find valid certification path to requested target
Caused by: org.springframework.web.client.ResourceAccessException: I/O error on GET request for "https://login.microsoftonline.com/0d285301-66f1-496e-9915-2008a8603591/v2.0/.well-known/openid-configuration": PKIX path building failed: sun.security.provider.certpath.SunCertPathBuilderException: unable to find valid certification path to requested target
This indicates that the certdog service does not trust the Microsoft certificate and can be caused if the certdog server was upgraded from an older version (or if several upgrades have been performed from an older version).
To rectify, download the later JKS trust file from here: dbssltrust.jks
Backup your existing JKS file here: [certdog install]\config\sslcerts\dbssltrust.jks (e.g. to dbssltrust.jks.backup) and copy the downloaded file to the same location, replacing the old file.
Restart the Krestfield Certdog Service