Signature Toolkit - User Guide
The Krestfield Signature Toolkit lets you look inside PKCS#7 and CMS (Cryptographic Message Syntax) signature files, verify the signatures they contain, inspect certificates and certificate paths, and generate new signatures.
This guide covers version 2.0 and above.
Key Features
-
Viewing of PKCS#7 and CMS compliant files, and of X.509 certificates
-
Verification of all signatures contained within PKCS#7/CMS files, including detached signatures
-
Support for RSA, ECDSA and the post-quantum ML-DSA (FIPS 204) and SLH-DSA (FIPS 205) algorithms
-
Viewing of certificates and display of certificate paths
-
Generation of PKCS#7/CMS compliant signatures using certificates from the Windows certificate store or a PKCS#12 file
-
Data Viewer and Type Converter, including a built-in ASN.1 viewer
Contents
- Installation
- Opening Signature Files
- Viewing Details
- Data Viewer
- Type Converter
- Viewing Certificates
- Certificate Path Display
- Verifying Signatures
- Generating Signatures
- Saving Certificates
- Options and Logging
- Keyboard Shortcuts
- Uninstalling
- Support
- Appendix
Installation
Pre-requisites
The Signature Toolkit may be installed on the following operating systems (64-bit):
-
Windows 10/11
-
Windows Server 2019
-
Windows Server 2022
-
Windows Server 2025
No other components are required. The .NET runtime the tool needs is included in the installer.
You must have local Administrator privileges on the system to install.
Install
Double click the SignatureToolkit msi file (e.g. SignatureToolkit-2.0.0-x64.msi)
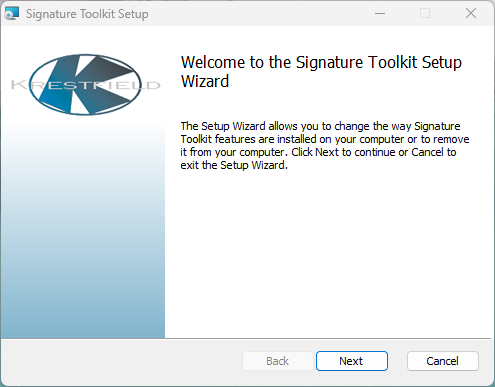
Click Next, accept the default folder, or click Change… to choose another, and click Next
Click Install, and then Finish once the installation completes
The installer will:
-
Install the tool to
C:\Program Files\Krestfield\Signature Toolkit -
Add a Signature Toolkit icon to the desktop
-
Add Signature Toolkit, Type Converter and Signature Toolkit User Guide entries to the Start menu, under Krestfield > Signature Toolkit
-
Associate the p7s, p7b and p7c file types with the tool
Note: If an earlier version of the Signature Toolkit is installed, it will be replaced. There is no need to uninstall it first.
Opening Signature Files
Start the tool by double clicking the desktop icon, or by starting Signature Toolkit from the programs list.
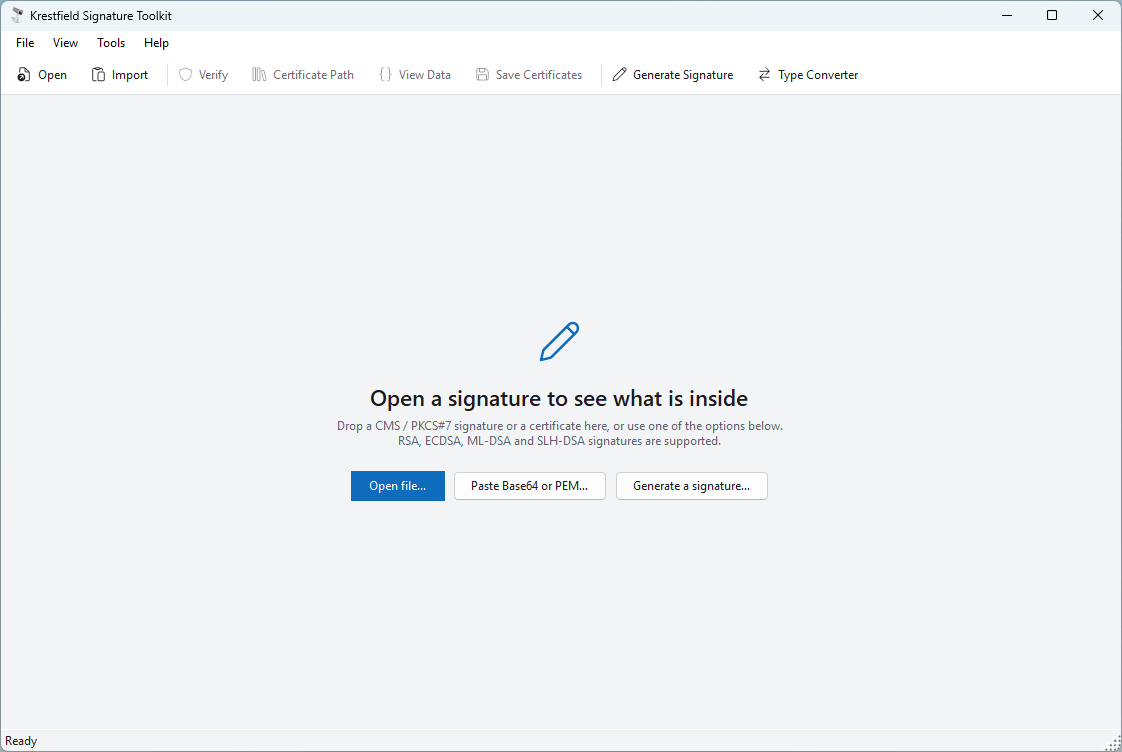
To open a file, do any of the following:
-
Click Open on the toolbar
-
Choose File > Open… from the menu
-
Drag a file onto the application window
-
Double click a p7s, p7b or p7c file in Windows Explorer
-
Choose a previously opened file from File > Open Recent
Dragging multiple files onto the application will open the first file in the current window and each of the others in a new window.
The following file types are offered when opening a file:
-
p7s – PKCS#7 Signature
-
p7b – Microsoft PKCS#7 Certificate Store
-
p7c – PKCS#7 Certificate Store
-
p7m, p7r, p7, cms, sig – other PKCS#7/CMS files
-
cer, crt, pem, der – X.509 certificates
Files with any other extension may also be opened (choose All files in the open dialog). The contents of the file, not its extension, determine whether it can be displayed.
The data within the file may be binary (DER), PEM, Base64 or hexadecimal. The format is detected automatically.
Importing Data
If you have a signature as text (for example, copied from an email, a log file or a web page) there is no need to save it to a file first.
Click Import on the toolbar, or choose File > Import Base64 or PEM…
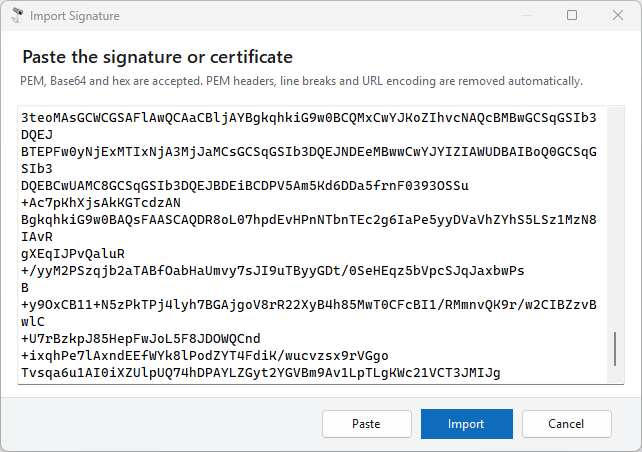
Paste the data into the window (or click Paste) and click Import.
PEM, Base64 and hexadecimal data are accepted. PEM headers, line breaks and URL encoding are removed automatically.
Viewing Details
Once a file has been opened, the main window is split into two panes.
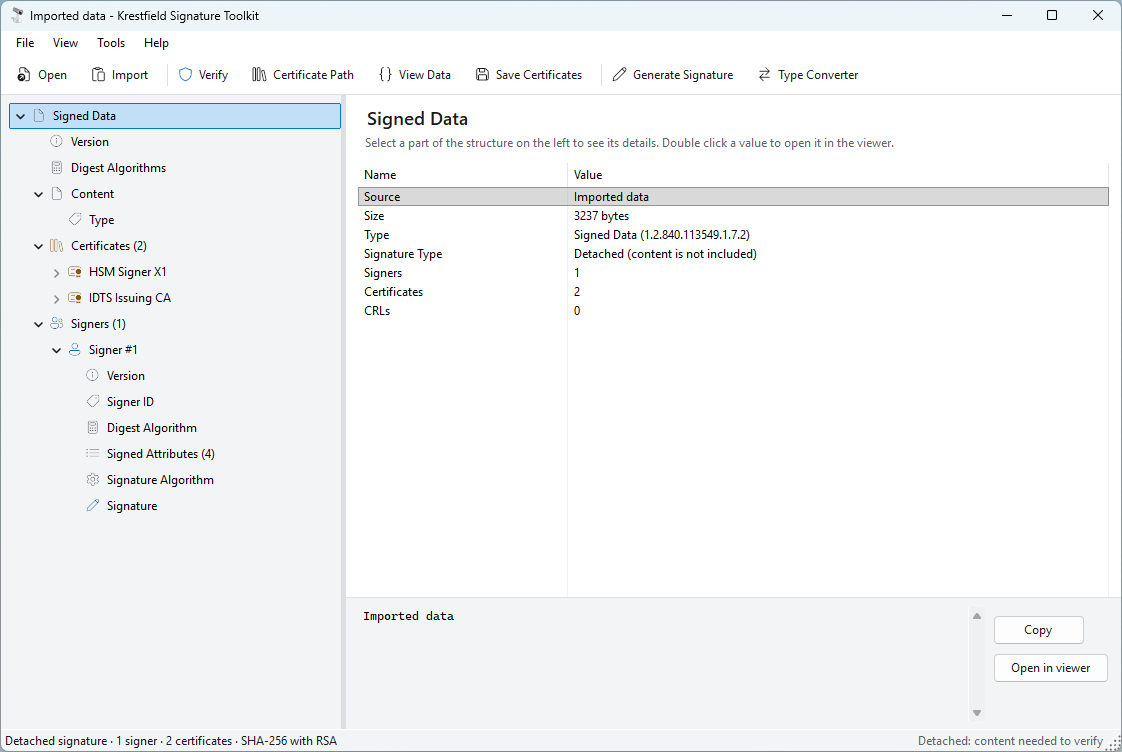
The left hand pane displays the items contained within the signature file as a tree. As specified in the SignedData type (RFC 5652), this may include:
-
Version – the version of the SignedData structure
-
Digest Algorithms – the hash algorithms used by the signers
-
Content – the data that was signed, where it is included in the file
-
Certificates – each certificate in the file, with its public key, extensions and signature
-
Certificate Revocation Lists – any CRLs included in the file
-
Signers – each signer, with the signer ID, digest algorithm, signed attributes, signature algorithm, signature value and unsigned attributes
Timestamps and counter signatures, where present, are shown beneath the signer they belong to.
The right hand pane displays the details of the item selected in the left pane.
Click any row in the right hand pane to show its full value in the preview area at the bottom of the window. From here:
-
Click Copy to copy the value to the clipboard
-
Click Open in viewer (or double click the row) to open the value in the Data Viewer
Right clicking a row provides further options, including Copy All Rows.
Where an action is available for the selected item (such as viewing a certificate or verifying a signature) a button is shown at the top right of the details pane. The same actions are available by right clicking the item in the tree.
The status bar at the bottom of the window shows a summary of the file: whether the signature is attached or detached, the number of signers and certificates, and the signature algorithms used.
Post-Quantum Signatures
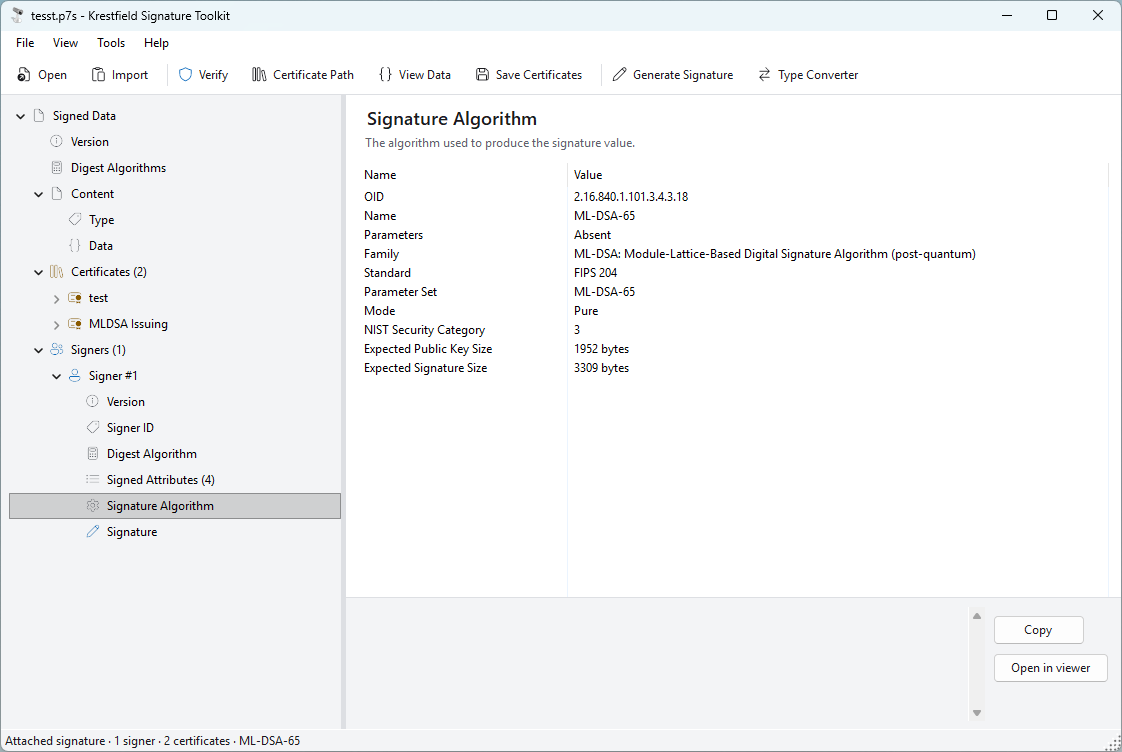
Signatures and certificates that use the post-quantum ML-DSA and SLH-DSA algorithms are displayed in the same way as any other.
When such an algorithm is selected (for example, the Signature Algorithm item beneath a signer) the details pane also shows the algorithm family, the standard it is defined in, the parameter set, the NIST security category and the expected public key and signature sizes.
Data Viewer
The Data Viewer displays a chosen item of data so that it can be easily viewed, converted and saved.
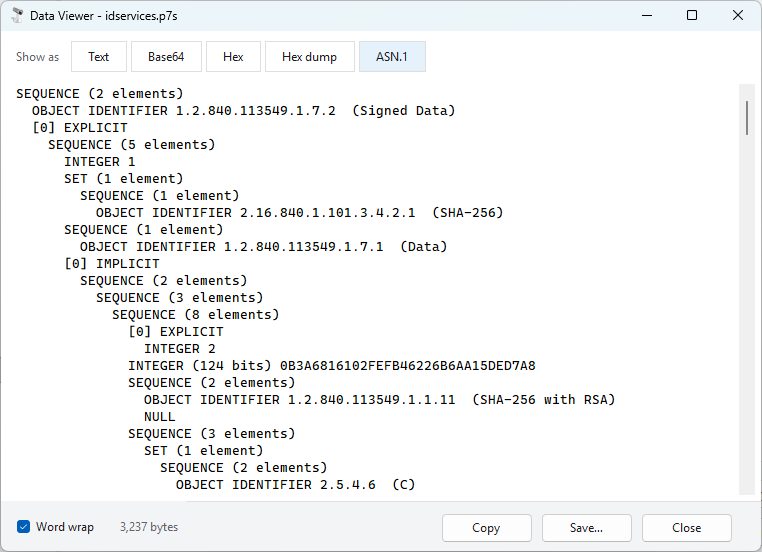
To view the whole signature file, click View Data on the toolbar or choose View > Signature Data…
To view a single value, double click it in the details pane.
Use the Show as buttons at the top of the window to convert between the following types:
-
Text
The textual representation of the data -
Base64
The Base64 representation -
Hex
The hexadecimal value. Displayed in the format AABBCC01020304… -
Hex dump
The offset, hexadecimal value and printable characters, 16 bytes per line -
ASN.1
A display of the ASN.1 structure (if the data is valid ASN.1). Known object identifiers, including those of the post-quantum algorithms, are shown with their names
Click Copy to copy the displayed text to the clipboard.
Click Save… to save the data. In the save dialog choose either Binary data, to save the raw bytes, or As displayed, to save the text exactly as it is shown.
Type Converter
The Type Converter is based on the Data Viewer described above, but also allows any file to be loaded and data to be typed or pasted in directly.
To open the Type Converter either:
-
Click Type Converter on the toolbar
-
Choose Tools > Type Converter from the menu
-
Run it from the Windows Start menu: Krestfield > Signature Toolkit > Type Converter
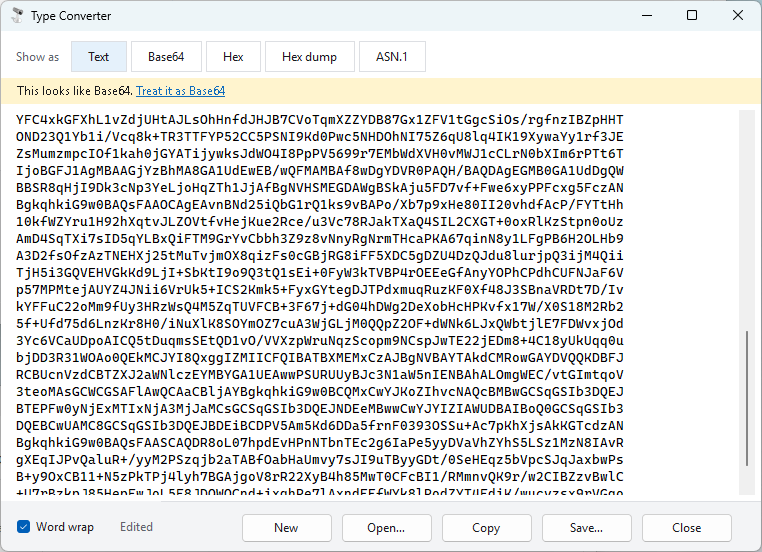
Either paste or type data into the window, click Open… to load a file from disk, or simply drag a file onto the tool.
Use the Show as buttons to convert between types, as with the Data Viewer.
If text that is typed or pasted in looks like Base64 or hexadecimal data, a prompt appears above the text:
This looks like Base64. Treat it as Base64
Click the link to have the data decoded. If the text is not encoded data (for example, it is a normal text string that happens to be valid Base64) simply ignore the prompt.
Click New to clear the window and start again.
Viewing Certificates
Certificates shown in the left hand pane may be viewed by selecting the certificate and choosing one of the following options:
-
Clicking the View Certificate button at the top right of the details pane
-
Choosing the View > Certificate… menu item
-
Right clicking the certificate and choosing View Certificate…
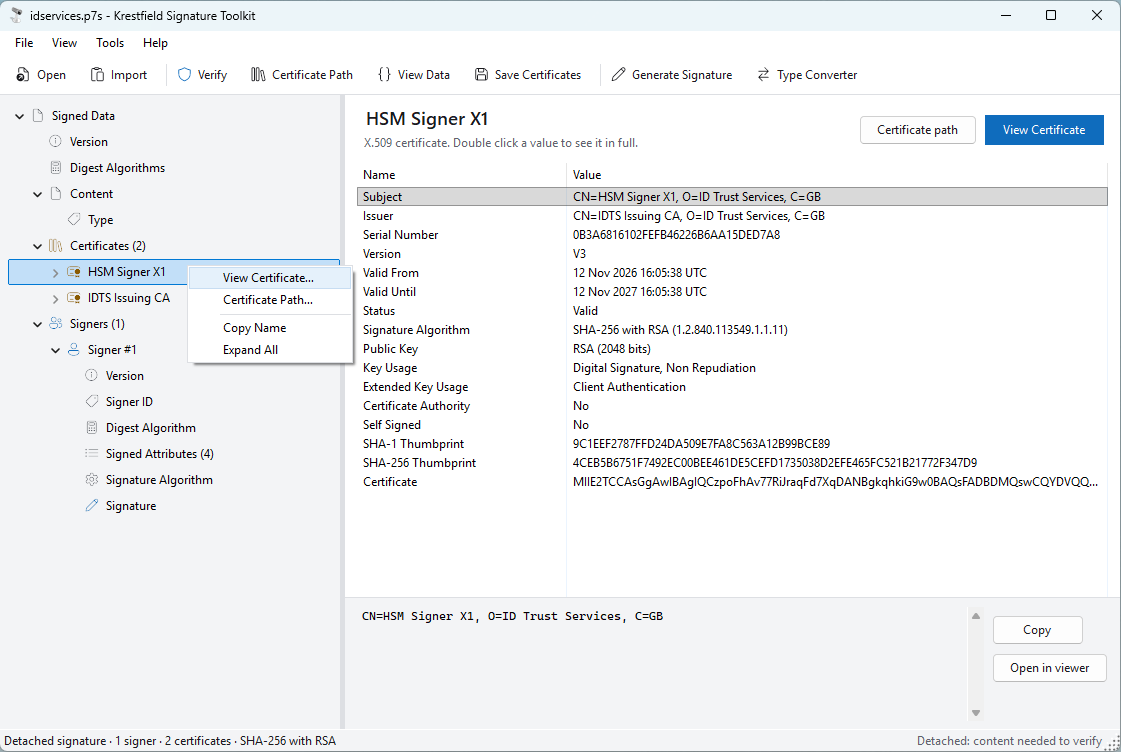
Choosing any of these options will bring up the Microsoft Windows certificate viewer where all certificate details will be displayed.
To view the certificate of a particular signer, select the Signer ID item beneath that signer and click View Signer Certificate (or double click the Signer ID item).
The details of a certificate can also be seen without leaving the tool. Selecting a certificate in the tree shows its subject, issuer, validity, key usage and thumbprints in the details pane. Expand the certificate to see its Public Key, Extensions and Signature.
Certificate Path Display
A certificate path builder is included with the tool. Once a signature file has been loaded, click Certificate Path on the toolbar to display the certificate path of the signer.
Alternatively choose the View > Certificate Path… menu item.
To display the path of a specific certificate, select it in the tree and click the Certificate path button at the top right of the details pane.
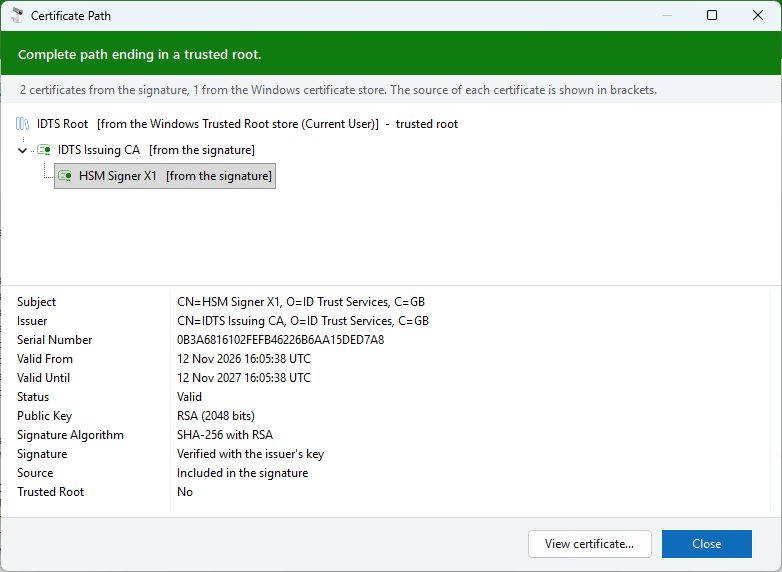
This window displays the certificate path from a root certificate (at the top) down to the end entity certificate. It will display certificates whether trusted or not.
The coloured bar at the top of the window summarises the result:
-
Complete path ending in a trusted root – every certificate was found and the root is in the Windows trusted root store
-
Complete path, but the root is not in the trusted root store – every certificate was found but the root is not trusted by Windows
-
Incomplete path – the issuer of one of the certificates could not be found
-
The path was built but there are problems with one or more certificates – every certificate was found, but at least one has a problem
Any problem found with a certificate (for example, that it has expired or is not marked as a certificate authority) is shown next to it.
Click a certificate to see its details, including where it was found. Double click a certificate, or click View certificate…, to open it in the Windows certificate viewer.
The tool uses certificates from the signature file and from the Windows Intermediate Certification Authorities and Trusted Root Certification Authorities stores (current user and local machine).
If you would prefer paths to be built only from the certificates within the signature file, this can be changed in the Options.
If a path does not complete it is probably due to a certificate not being available from the signature file nor the Windows store.
To rectify this import the required certificates to the Windows store. See the section in the Appendix at the end of this document.
Note: Certificates are not downloaded from the location given in the AIA (Authority Information Access) extension, and revocation is not checked.
Verifying Signatures
Signatures may be verified by clicking Verify on the toolbar, or by choosing Tools > Verify Signatures. This will verify the signature of every signer in the file.
The result will be displayed:
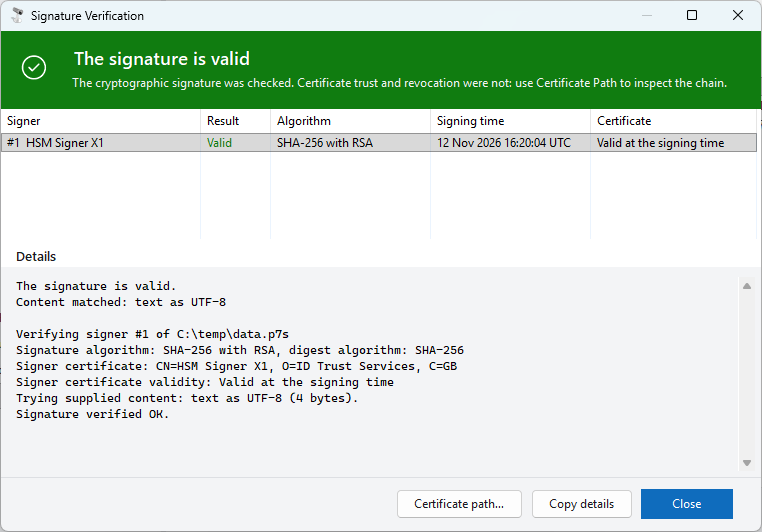
The window lists each signer together with the result, the signature algorithm, the signing time and whether the signer’s certificate was within its validity period.
Select a signer to see the detail of what was checked in the lower part of the window. If a signature could not be verified, the reason is given here. Click Copy details to copy this information to the clipboard.
If there is an error with the signature a results pane is displayed:
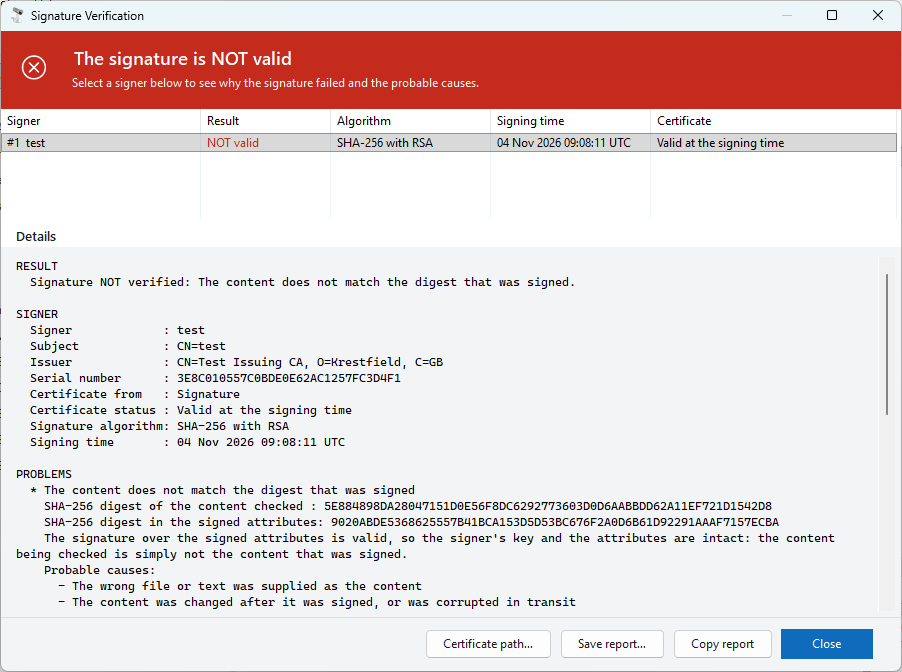
This view, will display likely causes for the signature failure assisting with any analysis.
Click Certificate path… to display the certificate path of the selected signer.
Note: Verification confirms that the signature is cryptographically valid, that is, that the content has not been altered and was signed with the key belonging to the signer’s certificate. It does not check whether the certificate is trusted in the environment it is intended for or has been revoked. Use the Certificate Path Display to inspect the certificate chain.
Verifying an Individual Signature
Signatures may also be verified individually, e.g. if there are multiple signers.
Select the signer (or the Signature item beneath it) in the tree view and click the Verify This Signature button at the top right of the details pane.
Counter signatures can be verified in the same way.
Detached Signatures
A detached signature does not contain the content that was signed. To verify it, the tool needs to be given the original content.
When verifying a detached signature the following window is displayed:
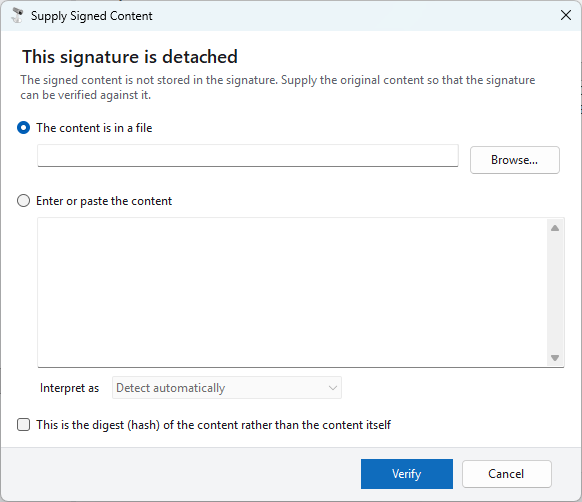
Either:
-
Select The content is in a file and click Browse… to choose the file that was signed, or
-
Select Enter or paste the content and type or paste the content into the box
If entering the content as text, the Interpret as option determines how it is treated. Leave this as Detect automatically unless you know the content was hexadecimal or Base64 encoded binary data.
If you have the digest (hash) of the content rather than the content itself, tick This is the digest (hash) of the content rather than the content itself.
Click Verify.
Once content that verifies has been supplied it is remembered until another file is opened, so it only needs to be provided once.
Verifying a CRL
If the file contains a Certificate Revocation List, select the CRL in the tree and click Verify CRL Signature. The signature on the CRL is verified using the certificates in the file and, if enabled, the Windows certificate stores.
Generating Signatures
A signature may be generated by clicking Generate Signature on the toolbar, or by choosing the Tools > Generate Signature… menu option.
The following window will be shown:
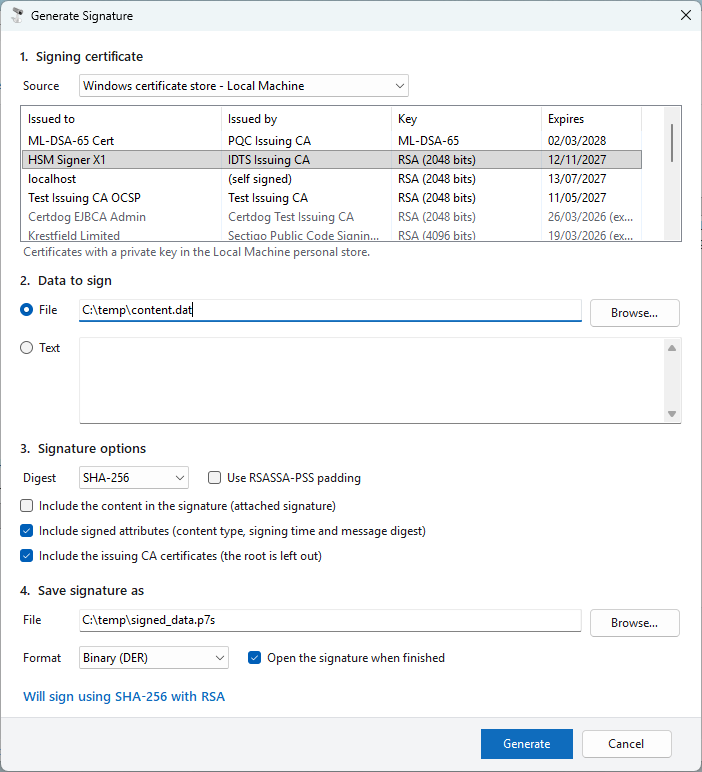
1. Signing certificate
Choose where the signing certificate is held from the Source list:
-
Windows certificate store - Current User
-
Windows certificate store - Local Machine
-
PKCS#12 file (.pfx / .p12)…
For the Windows certificate stores, certificates will only be listed if you have an associated private key available (either on the local machine, a smart card or other attached device).
For a PKCS#12 file, you will be prompted to choose the file and enter its password.
Select the required certificate from the list. The type of key held by each certificate (e.g. RSA, ECDSA, ML-DSA-65) is shown in the Key column.
2. Data to sign
Choose the data you wish to sign. Either:
-
Select File and click Browse… to choose a file, or
-
Select Text and type (or paste) the text to be signed
A file is signed exactly as it is stored on disk. Text is signed as UTF-8.
3. Signature options
-
Digest
The hash algorithm to use: SHA-256, SHA-384, SHA-512 or SHA-1. This applies to RSA and ECDSA keys only. For ML-DSA and SLH-DSA keys the digest is determined by the algorithm and this option is not available -
Use RSASSA-PSS padding
For RSA keys, generates an RSASSA-PSS signature rather than the default PKCS#1 v1.5 -
Include the content in the signature (attached signature)
If ticked, the signed data is included within the signature file. If unticked a detached signature is produced, and the original data will be needed to verify it -
Include signed attributes
Includes the content type, signing time and message digest as signed attributes. This is recommended -
Include the issuing CA certificates
Includes the certificates of the CAs that issued the signing certificate, where they can be found. The root certificate is not included
4. Save signature as
Enter, or click Browse… to choose, the location for the resulting signature file. If no extension is provided a p7s extension will be added to the file.
Choose the Format of the file:
-
Binary (DER) – the default
-
PEM
-
Base64
If you wish to view the generated signature on completion tick Open the signature when finished.
The algorithm that will be used is shown at the bottom of the window, for example:
Will sign using ML-DSA-65 (pure mode)
Click Generate and the signature will be generated using the private key associated with the certificate chosen.
Post-Quantum Signing Keys
ML-DSA and SLH-DSA signatures can be generated on any supported version of Windows when the certificate and key are held in a PKCS#12 file.
To sign with an ML-DSA or SLH-DSA key held in the Windows certificate store, the version of Windows must itself support these algorithms (Windows 11 version 24H2 or Windows Server 2025, with current updates). If it does not, an error will be displayed explaining this when Generate is clicked.
Saving Certificates
All of the certificates contained within a signature file can be saved in a single step.
Click Save Certificates on the toolbar, or choose File > Save All Certificates…, and choose a folder.
Each certificate is saved as a PEM encoded .cer file, named after the subject of the certificate. The folder is opened once the certificates have been saved.
Certificates can also be saved automatically every time a file is opened. See Options below.
Options and Logging
Choose Tools > Options… to change the following settings:
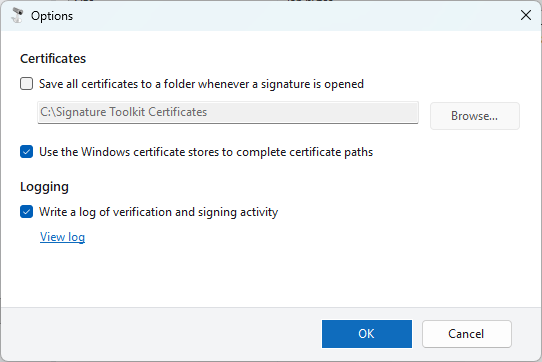
-
Save all certificates to a folder whenever a signature is opened
When ticked, the certificates from every file opened are saved to the folder specified -
Use the Windows certificate stores to complete certificate paths
When ticked (the default) the Windows intermediate and trusted root stores are used when building certificate paths and verifying CRLs. When unticked only the certificates within the signature file are used -
Write a log of verification and signing activity
When ticked (the default) details of the operations performed are written to a log file
Viewing the Log
The log records the steps taken when files are opened, signatures are verified and signatures are generated. It is the first place to look if a file fails to open or a signature fails to verify.
Choose Tools > View Log to display it.
From this window the log may be refreshed, copied or cleared. Click Open folder to open the folder containing the log file.
The log file is stored at:
%LocalAppData%\Krestfield\Signature Toolkit\SignatureToolkit.log.txt
Keyboard Shortcuts
| Shortcut | Action |
|---|---|
| Ctrl+O | Open a file |
| Ctrl+I | Import Base64 or PEM data |
| Ctrl+S | Save all certificates |
| Ctrl+W | Close the current signature |
| Ctrl+D | View the signature data in the Data Viewer |
| F5 | Verify signatures |
| Ctrl+G | Generate a signature |
| Ctrl+T | Open the Type Converter |
| F1 | Open the user guide |
Uninstalling
Open the Windows Settings
Choose Apps and then Installed apps
Locate Signature Toolkit
Click the … button, choose Uninstall and confirm when asked
Support
Please send all support issues to the following email address:
Our support team will be happy to help with any queries you may have.
Appendix
Adding Certificates to the Microsoft Store
If the Certificate Path Display cannot find some certificates, or reports that a root certificate is not trusted, then you may not have the required certificates in the Microsoft Certificate Store.
To view what certificates are currently in the store do the following:
Press the Windows key, type certmgr.msc or certlm.msc (to view Machine certificates) and press Enter. This opens the certificate manager for the current user.
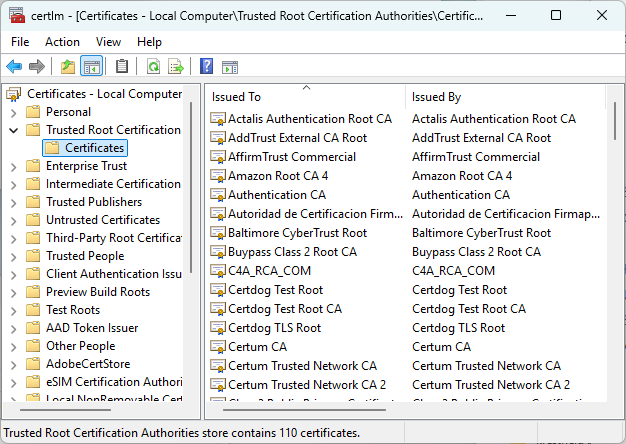
You may navigate between the folders to inspect what certificates are stored. For a path to be reported as trusted, the issuing root certificate must be held within the Trusted Root Certification Authorities store. Certificates of intermediate CAs are held within the Intermediate Certification Authorities store.
If the Certificate Path Display reports:
Complete path, but the root is not in the trusted root store
then you will need to import the root certificate into the Windows store if you wish it to be trusted.
If you have the root certificate in a file format double click to bring up the Microsoft certificate viewer. If the root certificate is contained within the signature file itself, either select the root certificate in the tool and click View Certificate, or use the Certificate Path Display to identify the root certificate. From the Certificate Path Display double click the root (top most) certificate to open the Microsoft certificate viewer.
From this window choose Install Certificate…
In the Certificate Import Wizard choose Place all certificates in the following store, click Browse… and select Trusted Root Certification Authorities. Click Next and then Finish.
A Security Warning window will be displayed and you must choose Yes to install the certificate into the Windows root certificate store.
Note: Once a root certificate is installed in this way it will be trusted by the operating system and all its components from then on. Ensure that only trusted roots are installed.
Obtaining Signing Certificates
A signing certificate may be obtained from a CA (Certificate Authority).
Your organisation may have a CA already in place for issuing certificates to users.
If this is not the case then there are several CAs that may be set up to issue certificates, such as Microsoft Active Directory Certificate Services, available with Windows Server platforms, or Krestfield Certdog.
Need more info? Contact us at support@krestfield.com