End Point Monitoring
This guide demonstrates how to configure certdog using Scripts to monitor a selection of URL endpoints and produce a simple HTML report that can be hosted within the certdog environment
This demo will attempt to connect to the selected URLs regularly and extract the TLS certificates. These will be imported into certdog for continual monitoring
1. Obtain the script
The script used in this demo can be downloaded from GitHub here:
https://github.com/krestfield/certdog-scripts/tree/main/discover-endpoint-certs
Place this in a suitable location. e.g. c:\certdog\scripts
2. Upload the Script
From the Scripts menu, upload the script and give it a name e.g. Get End Point Certificates. See here for more details on Scripts: https://krestfield.github.io/docs/certdog/scripts.html
3. Prepare Data
We will need a list of the end points to be monitored and we will need to create a list from these. As an example, if we wanted to monitor the following:
-
krestfield.com
-
google.com
-
server1.local
We can either create a comma separate list e.g.
"krestfield.com,google.com,server1.local"
Or an array string:
"['krestfield.com', 'google.com', 'server1.local']"
Either can be passed to the -endPoints parameter
Note that the URLs can also contain the port (if not 443) e.g. server1.local:883
An HTML file can be produced by the script. We could create a sub folder within the certdog environment to host this however, this can be placed anywhere. To place within the certdog hosting environment, create the following folder:
.\certdog\tomcat\webapps\certdog#reports
(This can be named anything but the certdog#reports part means the final URL will appear as certdog/reports which is consistent with the UI)
We could then set the -htmlFile parameter to:
C:\certdog\tomcat\webapps\certdog#reports\index.html
(assuming your certdog is at c:\certdog)
4. Configure the Task
From the Tasks menu, click Add New Task. Give it a name e.g. Monitor URLs and optionally a description
Set how often you want this to be repeated e.g. once per day or every hour etc.
For Script, select the script uploaded in step 2 above
For the Arguments, set as follows:
-apiToken [APITOKEN] -endPoints {end points} -htmlFile {html filename}
Which would result in something like:
-apiToken [APITOKEN] -endPoints "krestfield.com,google.com,server1.local" -htmlFile "C:\certdog\tomcat\webapps\certdog#reports\index.html"
E.g.

Select the option Run With User and select a user. This will be the user that the certificates will be associated with. You may want to consider creating a dedicated local user for this purpose. Alternatively, you can run as an Administrator user and pass in the additional -userId and -teamId parameters to set the owner details (see Options below)
Click Add
Testing
Allow the script to run. Monitoring the UI logs should show something like:

Local text logs (.\certdog\logs\certdog.log) will show further details e.g.
2026-10-07 16:52:43.837 DEBUG certdogapi - Script 'Get End Point Certificates' exited with code 0 with output:

Checking end point: krestfield.com
Connected to end point krestfield.com. 1 certificate(s) returned
  Existing certificate
    Id:            6ac63f1bc9ba9af09d35d89e
    Subject:       CN=krestfield.com
    Serial Number: 5538a38a09b0c96d0d7276919f231281
    Valid To:      2026-12-23 04:00:18
    Status:        OK

Checking end point: google.com
Connected to end point google.com. 1 certificate(s) returned
  Existing certificate
    Id:            6ac63f1bc9ba9af09d35d8a0
    Subject:       CN=*.google.com
    Serial Number: 44be0dde901ae99b0ab29255f94109e5
    Valid To:      2026-12-03 19:21:52
    Status:        OK

Checking end point: server1.local
Failed to connect to end point: server1.local. Error: No such host is known
From the browser, navigate to: https://yourcertdogserver/certdog/reports/
And if all has worked OK, the report should be displayed:
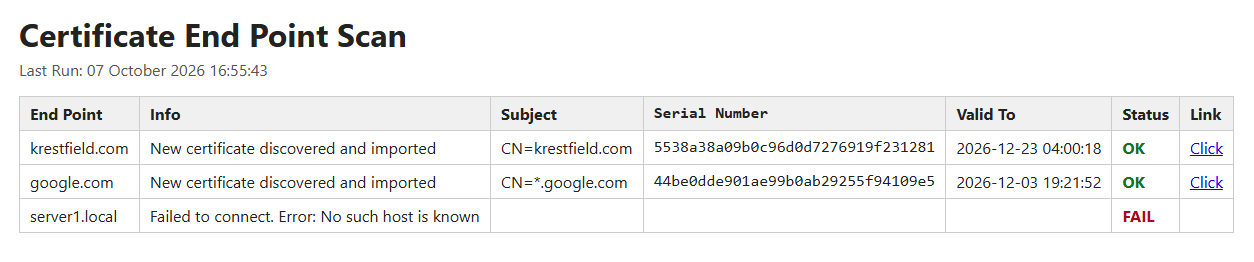
Discovered certificates will be imported and can be accessed via the link displayed. Any errors will also be displayed
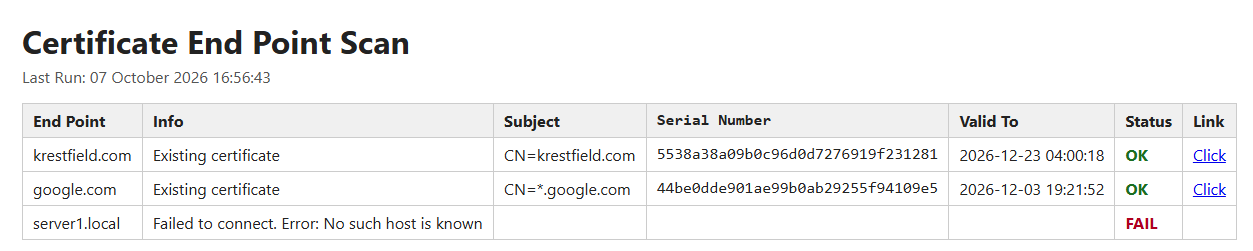
Previously discovered certificates will not be re-imported. Their status will just be displayed as Existing Certificate:
If the report is not displayed, check the file system to ensure the index.html file is being produced at the expected location
Double check the parameters to the script, ensuring there are surrounding quotes where required
If this fails, attempt to run the script locally from a PowerShell window with these parameters, manually providing a value for -apiToken
Options
Additional Parameters
The following additional parameters can be sent to the script:
-
-cssFile
-
If provided a css file can be placed at the report location (or somewhere else, if specified as a full path)
-
A sample report.css is provided in the GitHub location
-
If this was used and placed at the same location as the report the parameter would then be:
-cssFile report.css -
-
-htmlReportTitle
- If provided will override the default title with this text e.g.
-htmlReportTitle "Company URL Status" -
-ownerId
-
If provided will assign this user as the imported certificates owner
-
Note, you can only assign to a different user if you have authenticated as an admin (apiToken above is an admin user token)
-
-
-teamId
-
If provided will assign this team as the imported certificates team membership
-
Note, you can only assign to a different team if you have authenticated as an admin (apiToken above is an admin user token)
-
-
-extraInfo
- This can be any string based information and will be stored along-side the certificate
-
-includeChain (Switch)
- If this switch is provided, the entire certificate chain returned from the end point will also be processed
-
-timeoutSeconds
-
The timeout period in seconds before the connection to the end point is marked as a failure
-
Defaults to 10 seconds if not provided
-
-
-expiringSoonDays
- Specify the number of days to show a status of EXPIRING in the report
- Defaults to 30 days if not provided
Automating
As with everything in certdog, the task setup and editing can be automated via the REST API
The URLs could therefore be configured in another environment or in a text file etc. and the certdog API could be called to update this task with those URLs dynamically
In this case the call to make would be:
PATCH: /admin/task/{id}/update
The value for id is the value that appears in the browser address when editing the task from the UI e.g. if the URL is:
https://cd.krld.local/certdog/ui/?#/administration/task/6ac623b6c9ba9af09d35d73d/edit
Then the ID is 6ac623b6c9ba9af09d35d73d
The body follows this format:
{
  "enabled": true,
  "name": "string",
  "description": "string",
  "startingAt": "2026-10-07T15:40:10.955Z",
  "repeatEverySeconds": 0,
  "scriptId": "string",
  "scriptArguments": [
    "string"
  ],
  "runWithUser": true,
  "apiTokenUserId": "string"
}
This call can be tested and expirmented from the Swagger UI (accessed by clicking API - bottom right of the certdog UI)